Method 2: Reinstall the Windows Installer
loadTOCNode(2, 'resolution');
To reinstall the Windows Installer, rename the damaged Windows Installer files, and then reinstall the Windows Installer. To do this, follow these steps:
1.
Click Start, click Run, type cmd in the Open text box, and then click OK.
2.
Type cd %windir%\system32, and then press ENTER.
3.
Type attrib -r -s -h dllcache, and then press ENTER.
4.
Type ren msi.dll msi.old, and then press ENTER.
5.
Type ren msiexec.exe msiexec.old, and then press ENTER.
6.
Type ren msihnd.dll msihnd.old, and then press ENTER.
7.
Type exit, and then press ENTER.
8.
At the command prompt, type exit, and then press ENTER.
9.
Click Start, and then click Turn off computer or Shut Down.
10.
Select the Restart option, and then click OK, or click Restart.
11.
Log on to the computer.
12.
Download and install the latest version of the Windows Installer. For more information about how to obtain the Windows Installer, click the following article number to view the article in the Microsoft Knowledge Base:
893803 (http://support.microsoft.com/kb/893803/) Windows Installer 3.1 v2 (3.1.4000.2435) is available
13.
Click Start, and then click Turn off computer or Shut Down.
14.
Select the Restart option, and then click OK, or click Restart.
Thursday, May 15, 2008
How to resolve Common "Windows Installer" Problems
- How to resolve Common "Windows Installer" Problems
View products that this article applies to.
function loadTOCNode(){}
Author: Yuval Sinay MVP
Community Solutions Content Disclaimer
Article ID
:
555175
Last Review
:
February 21, 2006
Revision
:
1.0
SUMMARY
loadTOCNode(1, 'summary');
This knowledgebase can help you to resolve common Windows Installer problems.
Back to the top
SYMPTOMS
loadTOCNode(1, 'Symptoms');
When you try to install/uninstall some application/s, you may get warning messages like: "The Windows Installer Service could not be accessed" "Windows Installer Service couldn’t be started" "Could not start the Windows Installer service on Local Computer. Error 5: Access is denied."
Back to the top
CAUSE
loadTOCNode(1, 'cause');
The error messages usually appear after failed installation of MSI Package or Disabled "Windows Installer" service.
Back to the top
RESOLUTION
loadTOCNode(1, 'resolution');
Method 1 Unregister Windows Installer, and then reregister Windows Installer. To do this, follow these steps: 1. On the "Start" menu, click "Run:. 2. In the "Open" box, type "msiexec /unreg", and then press ENTER. 3. On the "Start" menu, click "Run". 4. In the "Open" box, type "msiexec /regserver", and then press ENTER. Method 2 Upgrade to Windows Installer version 2 or newer version. To do this, follow these steps: 1. Start Microsoft Internet Explorer, and then browse to the following Microsoft Web site: http://msdn.microsoft.com/downloads 2. In the left pane tree menu, click "Setup and System Administration", and then click "Setup". 3. Click "Windows Installer", and then click the appropriate link for your operating system. 4. Click "Download" to download and install Windows Installer version 2 or newer version. Method 3 Use Windows Installer CleanUp Utility to uninstall the failed product. Description of the Windows Installer CleanUp Utility http://support.microsoft.com/default.aspx?scid=kb;en-us;290301 Method 4 The Windows Installer service may disabled on the machine. 1. Go to "Start" -> "Run" , type "services.msc" and press on "Enter" button. 2. Double-click on the service named "Windows Installer". 3. Check the value in the "Startup type:" field. If it's currently set to "Disabled", then this is the problem. Change it by selecting "Manual" from the drop-down box. Method 5 Empty user and system "temp" folders. 1. Empty "%systemdrive%\temp" folder. 2. Empty "%systemdrive%\%windir%\temp" folder. 3. Empty "%systemdrive%\Documents and Settings\%username%\Local Settings\Temp". Method 6 Enable Windows Installer Logging and call to PSS support. How to Enable Windows Installer Logging http://support.microsoft.com/default.aspx?kbid=223300 How to Enable Windows Installer Logging in Windows XP http://support.microsoft.com/default.aspx?scid=kb;EN-US;314852 Method 7 Check correct DCOM and System permissions: http://support.microsoft.com/?id=319624 Method 8 If you just upgrade Windows XP workstation to service pack 2 and the windows installer problem appear only after this upgrade, please review the following knowledgebase: http://support.microsoft.com/default.aspx?scid=kb;en-us;885894 Method 9 Check that the installation path length and environment variables length are execute 255 characters Method 10 If you get the message error "Error 1628: Failed to complete script based install" And followed the instruction above and it didn’t resolve the problem and you just create fresh installation packet by using InstallShiled tool, please disable "Cache installation on local machine" option during the installation packet create process. Method 11 Check if there pending installation/s: Warning: You should only edit these registry entries if you really know what you're doing. Back up your hard disk first. a. Empty "InProgress" Registry Key Check the following registry key:HKLM\Software\Microsoft\Windows\CurrentVersion\Installer\InProgressand clean any entries that you find. b. Empty/Rename "PendingFileRenameOperations" Registry Key: Check the following registry key:HKLM\System\CurrentControlSet\Control\Session Manager\PendingFileRenameOperationsand clean any entries that you find. Method 12 Obtain update MSI Package from the software manufacture.
Back to the top
MORE INFORMATION
loadTOCNode(1, 'MoreInformation');
The Command-Line Options for the Microsoft Windows Installer Tool Msiexec.exe http://support.microsoft.com/default.aspx?scid=kb;en-us;314881 Windows Installer 3.1 is available http://support.microsoft.com/?id=893803 Windows Installer Error Messages http://msdn.microsoft.com/library/default.asp?url=/library/en-us/msi/setup/windows_installer_error_messages.asp PRB: "Setup Has Detected That Another Program Requires the Computer to Reboot" Error Message When You Try to Install Visual Studio .NEThttp://support.microsoft.com/default.aspx?scid=kb;en-us;830608
Back to the top
APPLIES TO
•
Microsoft Windows Server 2003, Enterprise Edition (32-bit x86)
•
Microsoft Windows XP Professional
•
Microsoft Windows XP Media Center Edition 2002
•
Microsoft Windows XP Home Edition
•
Microsoft Windows Server 2003, Standard Edition (32-bit x86)
•
Microsoft Windows Server 2003, Web Edition
•
Microsoft Windows Server 2003, Datacenter Edition (32-bit x86)
•
Microsoft Windows Server 2003, Enterprise Edition for Itanium-based Systems
•
Microsoft Small Business Server 2000 Standard Edition
Wednesday, April 30, 2008
Hacking IBM Thinkpad Bios Password
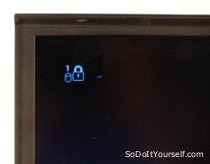
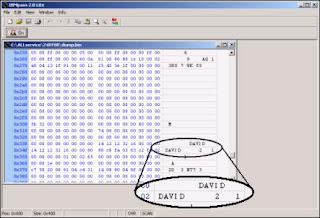
This article is based on a IBM ThinkPad T42. There are no guarantees and you might end up destroying your TP. So continue at your own risk. Other models this ought to work with are:
240, 240x
390E, 390x
570, 570E
600e, 600X
770Z
A20m, A21e, A21m, a22m, A30p, A31, A31p
G40, G41
R30, R31, R32, R40, R50, R51
Transnote, T20, T21, T22, T30, T40, T40p, T41, T42, T42p
X20, X21, X22, X23, X24, X30, X31, X40, X41
The supervisor (SVP) password is stored in a chip called ATMEL 24RF08.It can not be reset by disconnecting the BIOS battery or shorting any jumper. It has to be read in order to deciffer the password. For this we need some kind of hardware so read on…
Soldering the ATMEL 24RF08 Chip reader
To read this chip we need to interface with it using a secondary computer and some simple electronics. You will need to purchase this:
2 x 2200 Ohm Resistors
2 x C5V1 Zener diodes (For example BZX55/C5V1 )
Serial Port 9 pin Female
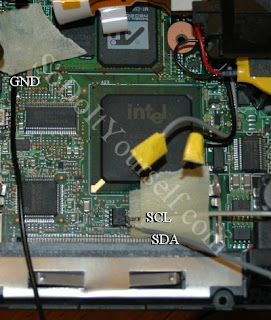
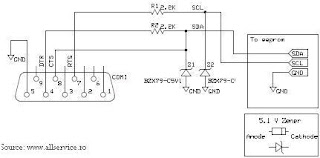
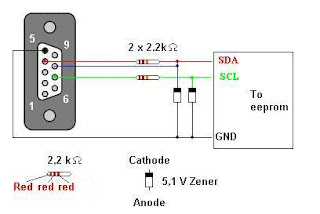
The serial port can be salvaged from any old PS2 type mouse. The zeners and resistors can be found in scrap electronics, but they are rather cheap so i would not bother. Solder them according to the image below. Leave the wires leading to SDA , SCL and GND. These will be connected to the TP later.
Here is a simplified schematic for those unfamilliar with the above symbols:
Locating the ATMEL chip
Usually the ATMEL chip is located somewhere below the touchpad. Start off by remving the keyboard and mousepad. This is done by unscrewing a couple of screws located under the TP. It is quite clearly illustrated on the bottom side of your ThinkPad.
Pull the TP keyboard up and let it rest against the screen. Pry off the touchpad part and fold it over where the keyboard used to be. Remove the WiFi card.
Under it all you should find a chip with something like this printed:
ATMEL
24RFC8
0446
Heres a closeup of the Atmel chip. Click to enlarge.
You can see the Atmel right under were the Wifi card used to sit:
Soldering the ThinkPad
Now this is the tricky part. You will have to solder 3 wires to the motherboard of your TP. Two wires to the ATMEL chip and one to ground. The ground is a piece of cake, just solder it anywhere you can find ground. The mounting screw holes on the motherboard is a good place. Solder 3 wires according to the image below:
As you can see, the SCL and SDA are located right next to eachother. It can be difficult to hold them in place while soldering. I have used some tape to hold them in place. The tape can be left there to minimze the risk of pulling off the soldered wires during the next steps.
Leave these wires unconnected and make them ready by peeling off the insulation. These will be connected to the reader ciruit later on. Make sure they can not reach ground or short circuit in any way.
Preparing the spare PC
You have made the hardware to read the chip, so now you need to supply the software. There is this great sofware made by http://www.allservice.ro/ that can be found here:
http://home.ripway.com/2005-7/365678/index.htm - Select R24RF08 v2.0b - Reader for ATMEL 24RF08 (Freeware)
While you are at it, download the Supervisor Password decoder IBM Pass 2.0 Lite found here:
http://home.ripway.com/2005-7/365678/index.htm
Also great software made available by http://www.allservice.ro/ .
Note:
Softpedix wrote that the download mirror has limited bandwidth. If you can’t download with the above, try these:http://www.allservice.ro/forum/viewtopic.php?t=61 – Programmerhttp://www.allservice.ro/forum/viewtopic.php?t=56 – IBMpass Lite
Install the software.
Connect the ATMEL chip reader to the spare PC.
Fire up a command promt(Start->run type cmd) and navigate to the folder where you installed R24RF08 v2.0b. Type in (don’t hit Enter):
r24rf08 dump.bin
Dumping the password
Turn on your ThinkPad with all the wiring you just soldered.
Press F1 during the startup to enter the BIOS.
Wait untill all activity stops, blinking HDD leds and such.
Connect the ATMEL Chip reader. GND first then the SDA and SCL.
Now go to your spare PC and Hit enter on the command prompt.
Now there should be a file created in the same folder with the name dump.bin. Disconnect all the wiring off your TP and assemble it back together.
Decoding the Supervisor Password
On your Spare PC start the program IBM Pass 2.0 Lite. Load the file you just created (dump.bin). Navigate with the scroll list to the memory address of 0×330. Tada! It should look something like this: (see pics above)
Ive already done these procedures and works excellent.
credits to those all that publish this article
this is a copy only.
Monday, April 28, 2008
HP Color LaserJet and LaserJet Series Printers - Printer Beeps
HP Color LaserJet and LaserJet Series Printers - Issues when Connected to an Uninterruptible Power Supply/Power Strip/Surge Protector
Problems or issues may arise when an HP Color LaserJet or LaserJet series printer is connected to an uninterruptible power supply (UPS), a power strip, or a surge protector.
SOLUTION:
Plug the printer directly into a wall outlet to test. The surge protector or UPS may not be allowing sufficient voltage through to the printer.
CAUSE:
During the printing process, the level of current passing through the UPS, surge protector, or power strip fluctuates slightly, causing an inadequate supply of power to the printer. The following are common symptoms:
High pitched squealing, beeping sounds, or alarms (UPS)
NOTE: Noise over the phone line can also cause high-pitched squeals and beeping sounds.
Inexplicable or false error messages
Printer will not “wake up“ from sleep mode
Printer appears to be DOA
Incorrect printout
Slower than normal printing
The printer control panel display is blank or shows garbled characters
Accessories, such as attached copier/scanners, do not function properly
Monitor loses power or shuts off
Computer reboots when job is printing
Job only prints half way, causing a paper jam
SUMMARY:
If it is necessary for the product to be connected to the above-mentioned devices, consider the following items:
There are many UPS configurations and load conditions that can affect proper printer operation. Depending on these configurations or load conditions, printer functionality cannot be predicted.
No damage to current HP LaserJet products will occur, but, depending on their particular UPS configuration, the printer may or may not operate properly.
Printing while on a UPS battery backup is not recommended because of the large power requirements of HP LaserJet products.
If the HP LaserJet printer is not operating properly and power line conditions are suspected, try a different circuit (a different wall plug located away from the current one), or try removing it from the UPS.
Sunday, April 27, 2008
A blank Web page is displayed when you start Internet Explorer 7
A blank Web page is displayed when you start Internet Explorer 7
View products that this article applies to.
Article ID
:
945385
Last Review
:
December 4, 2007
Revision
:
1.4
On This Page
SYMPTOMS
When you start Windows Internet Explorer 7, your home page does not open. Instead, a blank Web page is displayed.Additionally, you may receive an error message that resembles the following:
Line 56 Char:2 Error: Element not foundCode: 0URL:http://runonce.msn.com/runonce2aspx This problem typically occurs after you install Internet Explorer 7, after you install Windows, or after you reset Internet Explorer settings. This problem may occur only for certain users.
Back to the top
CAUSE
This problem occurs if the Customize Your Settings Web page in Internet Explorer 7 is not loaded correctly or if the Customize Your Settings Web page opens with restricted security settings.
Back to the top
RESOLUTION
To resolve this problem, create and run a Skiprunonce.reg file for each user account that experiences the problem. To do this, follow these steps:
1.
Start a text editor, such as Notepad.
2.
Copy the following information, paste it into the text editor, and then save the file as Skiprunonce.reg:Windows Registry Editor Version 5.00
[HKEY_CURRENT_USER\Software\Microsoft\Internet Explorer\Main]
"RunOnceHasShown"=dword:00000001
"RunOnceComplete"=dword:00000001
3.
Exit the text editor.
4.
Double-click the Skiprunonce.reg file that you created in step 2. Now when users run the .reg file, they receive the following message:
Are you sure you want to add the information in path of .reg file to the registry?If the user clicks Yes, the user receives the following message:
Information in path of .reg file has been successfully entered into the registry.Notes
•
In Windows Vista, when non-administrator users try to run SkipRunOnce.reg they are prompted for an administrator password.
•
To run SkipRunOnce.reg for all users at the same time, an administrator can modify [HKEY_LOCAL_MACHINE\Software\Microsoft\Internet Explorer\Main] instead of [HKEY_CURRENT_USER\Software\Microsoft\Internet Explorer\Main] in the SkipRunOnce.reg file.
Back to the top
Advanced users sectionImportant This section, method, or task contains steps that tell you how to modify the registry. However, serious problems might occur if you modify the registry incorrectly. Therefore, make sure that you follow these steps carefully. For added protection, back up the registry before you modify it. Then, you can restore the registry if a problem occurs. For more information about how to back up and restore the registry, click the following article number to view the article in the Microsoft Knowledge Base:
322756 (http://kbalertz.com/Feedback.aspx?kbNumber=322756/) How to back up and restore the registry in WindowsThis section is intended for advanced computer users. If you are not comfortable with advanced troubleshooting, you might want to ask someone for help or to contact support. For information about how to do this, visit the following Microsoft Web site:
http://support.microsoft.com/contactus (http://support.microsoft.com/contactus)Make sure that the RunOnceHasShown and RunOnceComplete registry keys exist and that they are set to a value of 1. To do this, follow these steps:
1.
Click Start, click Run, type regedit, and then click OK.
2.
Locate the following registry subkey, and then click it:
HKEY_CURRENT_USER\Software\Microsoft\Internet Explorer\Main
3.
In the details pane, double-click the RunOnceHasShown registry entry.Note If the RunOnceHasShown registry entry is not located in the details pane, you must create it. To do this, point to New on the Edit menu, click DWORD Value, and then type RunOnceHasShown in the New Value box.
4.
In the Value data box, type 1, and then click OK.
5.
In the details pane, double-click the RunOnceComplete registry entry.Note If the RunOnceComplete registry entry is not located in the details pane, you must create it. To do this, point to New on the Edit menu, click DWORD Value, and then type RunOnceComplete in the New Value box.
6.
In the Value data box, type 1, and then click OK.
7.
Close Registry Editor.
Back to the top
Similar problems and resolutions
To troubleshoot similar problems, self-help steps for beginning to intermediate computer users are available at the following Microsoft Web site:
Troubleshoot problems in which Windows Internet Explorer stops responding or crashes (http://support.microsoft.com/gp/pc_ie_intro)Note This Guided Help content may not be available in all languages.
Back to the top
APPLIES TO
•
Windows Internet Explorer 7
User account applet is compltely blank
User Accounts applet is completely blank
Symptom
When you double-click User Accounts applet in the Control Panel, the User Accounts applet opens, but it may be completely blank. The buttons Back Forward Home are displayed in the dialog.
Resolution
To resolve the problem, type these commands from Start, Run dialog:
regsvr32 jscript.dll
If that does not help, execute the following commands as well.
regsvr32 nusrmgr.cplregsvr32 /i mshtml.dll
Related articles
Several dialog boxes are blank
Working with User Accounts in Windows XP
User Accounts applet background is White even when XP Theme is enabled
Subscribe to:
Posts (Atom)